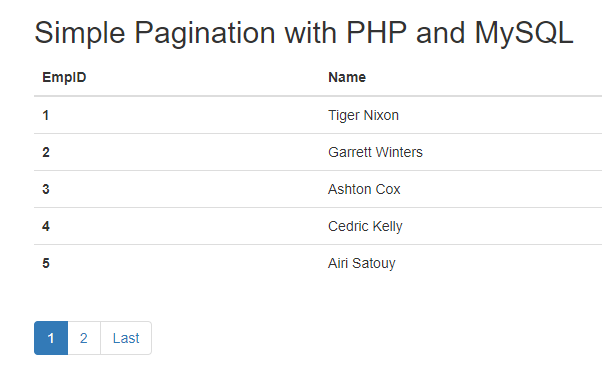
Pagination is an important part of any web application. It’s a process of dividing large content into small parts and displaying on multiple pages in chunks. When data grows in web applications, it cannot be displayed on a single page as it will create issue like browser hang and long vertical scroll. So the pagination is the best way to increase user experience to handle large data to display in a smart way without any issue to viewer. So here in this tutorial, you will learn how to create simple dynamic pagination with PHP and MySQL with example. We have also given a link to download complete source code of this example to implement pagination in your web application.
You may also like:
- Create Simple Pagination with PHP, MySQL and jQuery
- DataTable Pagination using PHP & MySQL
- Create Bootstrap Table Pagination with jQuery
As we will cover this tutorial with live example to create simple pagination with PHP and MySQL, so the file structure for this example is following.
- db_connect.php
- index.php
Step1: Create MySQL Table and Insert Records
First we will create MySQL database table employee and insert few records to create pagination example page to create pagination. We will create table using below query.
CREATE TABLE `employee` (
  `id` int(11) NOT NULL COMMENT 'primary key',
  `employee_name` varchar(255) NOT NULL COMMENT 'employee name',
  `employee_salary` double NOT NULL COMMENT 'employee salary',
) ENGINE=InnoDB DEFAULT CHARSET=latin1;
We will insert some records into employee table using below query:
INSERT INTO `employee` (`id`, `employee_name`, `employee_salary`) VALUES
(2, 'Smith', 170750),
(3, 'Jhon', 86000),
(6, 'Andy', 372000),
(7, 'Flower', 137500),
(8, 'Steve', 327900),
(9, 'William', 205500),
(10, 'Dany', 103600),
(11, 'Dove', 120000),
(12, 'Kim', 14000),
(13, 'Frost', 20000);
Step2: Make Connection to MySQL Database
We will change in db_connect.php to create MySQL database connection.
<?php
$servername = "localhost";
$username = "root";
$password = "12345";
$dbname = "demos";
$conn = mysqli_connect($servername, $username, $password, $dbname);
?>
Step3: Implement Pagination with PHP and MySQL
Now in index.php file, we will implement pagination with PHP, MySQL and Bootstrap. We will get records from MySQL table employee and handle simple pagination functionality. We will use Bootstrap HTML to display records with pagination. Here is complete code of simple pagination with PHP, MySQL and Bootstrap.
<?php
	include_once("db_connect.php");
	$showRecordPerPage = 5;
	if(isset($_GET['page']) && !empty($_GET['page'])){
		$currentPage = $_GET['page'];
	}else{
		$currentPage = 1;
	}
	$startFrom = ($currentPage * $showRecordPerPage) - $showRecordPerPage;
	$totalEmpSQL = "SELECT * FROM employee";
	$allEmpResult = mysqli_query($conn, $totalEmpSQL);
	$totalEmployee = mysqli_num_rows($allEmpResult);
	$lastPage = ceil($totalEmployee/$showRecordPerPage);
	$firstPage = 1;
	$nextPage = $currentPage + 1;
	$previousPage = $currentPage - 1;
	$empSQL = "SELECT id,employee_name, employee_salary
	FROM `employee` LIMIT $startFrom, $showRecordPerPage";
	$empResult = mysqli_query($conn, $empSQL);
	?>
	<table class="table ">
	<thead>
		<tr>
			<th>EmpID</th>
			<th>Name</th>
			<th>Salary</th>
		</tr>
	</thead>
	<tbody>
		<?php
		while($emp = mysqli_fetch_assoc($empResult)){
		?>
			<tr>
				<th scope="row"><?php echo $emp['id']; ?></th>
				<td><?php echo $emp['employee_name']; ?></td>
				<td><?php echo $emp['employee_salary']; ?></td>
			</tr>
		<?php } ?>
	</tbody>
	</table>
	<nav aria-label="Page navigation">
	  <ul class="pagination">
	  <?php if($currentPage != $firstPage) { ?>
		<li class="page-item">
		  <a class="page-link" href="?page=<?php echo $firstPage ?>" tabindex="-1" aria-label="Previous">
			<span aria-hidden="true">First</span>
		  </a>
		</li>
		<?php } ?>
		<?php if($currentPage >= 2) { ?>
			<li class="page-item"><a class="page-link" href="?page=<?php echo $previousPage ?>"><?php echo $previousPage ?></a></li>
		<?php } ?>
		<li class="page-item active"><a class="page-link" href="?page=<?php echo $currentPage ?>"><?php echo $currentPage ?></a></li>
		<?php if($currentPage != $lastPage) { ?>
			<li class="page-item"><a class="page-link" href="?page=<?php echo $nextPage ?>"><?php echo $nextPage ?></a></li>
			<li class="page-item">
			  <a class="page-link" href="?page=<?php echo $lastPage ?>" aria-label="Next">
				<span aria-hidden="true">Last</span>
			  </a>
			</li>
		<?php } ?>
	  </ul>
	</nav>
Also, read:
- Image Upload and Crop in Modal with PHP and jQuery
- Upload Multiple Images using jQuery, PHP & MySQL
- Reduce or Compress Image Size While Uploading in PHP
- Image Upload without Page Refresh with PHP and jQuery
- Amazon S3 File Upload using PHP
- Angular Multiple File Upload with PHP and MySQL
- Create Thumbnails While Uploading Images with PHP & jQuery
- Amazon S3 File Upload using JavaScript
You can view the live demo from the Demo link and can download the script from the Download link below.
Demo Download

veryyyyy simple and very very good
thanks
i `m iranian and love you
thanks again it helps me very much
Thanks!
Helped me a lot
Thank you very much
in downloaded code there is no database
The database table details is already in tutorial. Thanks!
Its my duty as a well wisher to tell you about small mistake on your page.
Your spelling of “advance” is wrong on the page title , please make it correct.
Thanks for great suggestions, now fixed it. Many thanks!