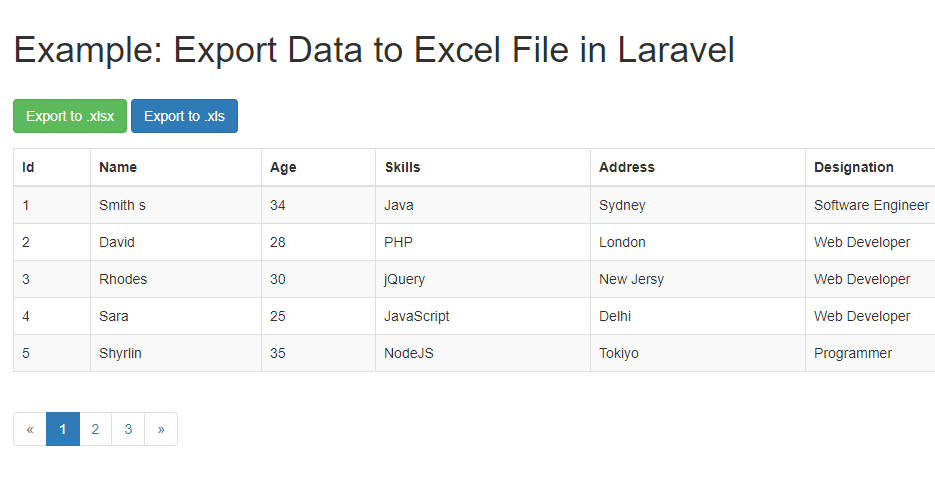
Data Export to Excel (xlsx or xls) format is feature of web project to allow users to export MySQL data for further use. In our previous tutorial you have learned how to export data to excel with PHP, in this tutorial you will learn how to export data to excel in Laravel framework. As PHPExcel is deprecated with latest Laravel version, so we will use PhpSpreadsheet to create excel file with collection data.
Also, read:
We will cover this tutorial in easy steps with live example to allow data export to xlsx and xls file and link to download complete source code of running demo.

As we will cover this tutorial with live example to export data to excel in Laravel, so the major files that we will create for this example is following.
- Emp.php: Employee model
- EmpController.php: Employee controller
- employee.blade.php: Employee view
Step1: Create Database Table
First we will create MySQL database table emp to store employee details to display and export into Excel file.
CREATE TABLE `emp` (

  `id` int(11) NOT NULL,

  `name` varchar(255) NOT NULL,

  `skills` varchar(255) NOT NULL,

  `address` varchar(255) NOT NULL,

  `designation` varchar(255) NOT NULL,

  `age` int(11) NOT NULL

) ENGINE=InnoDB DEFAULT CHARSET=latin
We will also insert few records to create example.
INSERT INTO `emp` (`id`, `name`, `skills`, `address`, `designation`, `age`) VALUES

(1, 'Jhone', 'Java', 'Sydney', 'Software Engineer', 34),

(2, 'David', 'PHP', 'London', 'Web Developer', 28),

(3, 'Rhodes', 'jQuery', 'New Jersy', 'Web Developer', 30),

(4, 'Sara', 'JavaScript', 'Delhi', 'Web Developer', 25),

(5, 'Shyrlin', 'NodeJS', 'Tokiyo', 'Programmer', 35),

(6, 'Steve', 'Angular', 'London', 'Web Developer', 28),

(7, 'Cook', 'MySQL', 'Paris', 'Web Developer', 26),

(8, 'Root', 'HTML', 'Paris', 'Web Developer', 28),

(9, 'William', 'jQuery', 'Sydney', 'Web Developer', 23),

(10, 'Nathan', 'PHP', 'London', 'Web Developer', 28),

(11, 'Raman', 'PHP', 'Delhi', 'Web Developer', 38),

(12, 'Mohan', 'PHP', 'Delhi, India', 'Web Developer', 30);
Step2: Create and Configure Laravel Project
If you have already running Laravel project then you can skip this step otherwise first create your Laravel project using below composer:
$ composer create-project --prefer-dist laravel/laravel project-name
Now we will .env file from project root directory and update MySQL database connection details like shown below.
DB_CONNECTION=mysql

DB_HOST=127.0.0.1

DB_PORT=3306

DB_DATABASE=database_name

DB_USERNAME=root

DB_PASSWORD=
Step3: Create Emp Model
Now we will create Model Emp using below command.
$ php artisan make:model Emp -m
The Emp model will be created in app/Emp.php. We will use MySQL database table emp to get employee data.
<?php

namespace App;

use Illuminate\Database\Eloquent\Model;

class Emp extends Model {

	 protected $table = 'emp';

}
Step4: Create Emp Controller
We will create EmpController using below command. The EmpController.php file will be created in at app/Http/Controllers.
$ php artisan make:controller EmpController
Now we will make changes into EmpController.php to add new index() function as showing below, which will fetch all records from emp model with pagination and it will return view employee. We will also add new function export() to all records and then create Excel spreadsheet using PhpSpreadsheet. Below is complete code of EmpController.php.
<?php

namespace App\Http\Controllers;

use Illuminate\Http\Request;

use PhpOffice\PhpSpreadsheet\Spreadsheet;

use PhpOffice\PhpSpreadsheet\Writer\Xlsx;

use PhpOffice\PhpSpreadsheet\Writer\Xls;

use App\Emp;

class EmpController extends Controller {

    public function index(){

        $emp = Emp::paginate(5);

        return view('employee', ['emp' => $emp]);

    }

	public function export($type) {

		$employees = Emp::all();

		$spreadsheet = new Spreadsheet();

        $sheet = $spreadsheet->getActiveSheet();

        $sheet->setCellValue('A1', 'Id');

        $sheet->setCellValue('B1', 'Name');

		$sheet->setCellValue('C1', 'Age');

        $sheet->setCellValue('D1', 'Skills');

        $sheet->setCellValue('E1', 'Address');

		$sheet->setCellValue('F1', 'Designation');

		$rows = 2;

		foreach($employees as $empDetails){

			$sheet->setCellValue('A' . $rows, $empDetails['id']);

            $sheet->setCellValue('B' . $rows, $empDetails['name']);

            $sheet->setCellValue('C' . $rows, $empDetails['age']);

            $sheet->setCellValue('D' . $rows, $empDetails['skills']);

			$sheet->setCellValue('E' . $rows, $empDetails['address']);

            $sheet->setCellValue('F' . $rows, $empDetails['designation']);

            $rows++;

		}

	    $fileName = "emp.".$type;

		if($type == 'xlsx') {

			$writer = new Xlsx($spreadsheet);

		} else if($type == 'xls') {

			$writer = new Xls($spreadsheet);

		}

		$writer->save("export/".$fileName);

		header("Content-Type: application/vnd.ms-excel");

        return redirect(url('/')."/export/".$fileName);

    }

}
Step5: Display Employee Records with Export Button
Now we will create employee view file at resources/views/employee.blade.php to display employee records and button to export data into Excel file.
<div class="container">

	<h1>Example: Export Data to Excel File in Laravel</h1>

	 <br>

	 <div class="form-group">

		 <a href="{{ url('/') }}/export/xlsx" class="btn btn-success">Export to .xlsx</a>

		<a href="{{ url('/') }}/export/xls" class="btn btn-primary">Export to .xls</a>

	 </div>

	 <table class="table table-striped table-bordered ">

		<thead>

		<tr>

			<th>Id</th>

			<th>Name</th>

			<th>Age</th>

			<th>Skills</th>

			<th>Address</th>

			<th>Designation</th>

		</tr>

		</thead>

		<tbody>

			@foreach($emp as $empDetails)

			<tr>

			<td>{{ $empDetails->id }}</td>

			<td>{{ $empDetails->name }}</td>

			<td>{{ $empDetails->age }}</td>

			<td>{{ $empDetails->skills }}</td>

			<td>{{ $empDetails->address }}</td>

			<td>{{ $empDetails->designation }}</td>

			</tr>

			@endforeach

		</tbody>

	</table>

	{{ $emp->links() }}

</div>
Step6: Change Default Route
We will make changes into routes/web.php to add route to PostController and it’s index function. We will also add a new route in to access export method from the view with excl file type to export data into xlsx or xls file.
Route::get('/', 'EmpController@index');

Route::get('/export/{type}', 'EmpController@export');
You may also like:
- Build Live Chat System with Ajax, PHP & MySQL
- Create Event Calendar with jQuery, PHP and MySQL
- Build Invoice System with PHP & MySQL
- Push Notification System with PHP & MySQL
- Create Bootstrap Cards with PHP and MySQL
- Build Content Management System with PHP & MySQL
- Convert Unix Timestamp To Readable Date Time in PHP
- Ajax Drop Down Selection Data Load with PHP & MySQL
- Inventory Management System with Ajax, PHP & MySQL
- Drag and Drop File Upload using jQuery and PHP
- Load Dynamic Content in Bootstrap Popover with Ajax, PHP & MySQL
You can download the full script from the Download link below.
Download
