In our previous Laravel tutorial, we have explained how to build Restful API in Laravel. In this tutorial we will explain how to perform CRUD operations in Laravel.
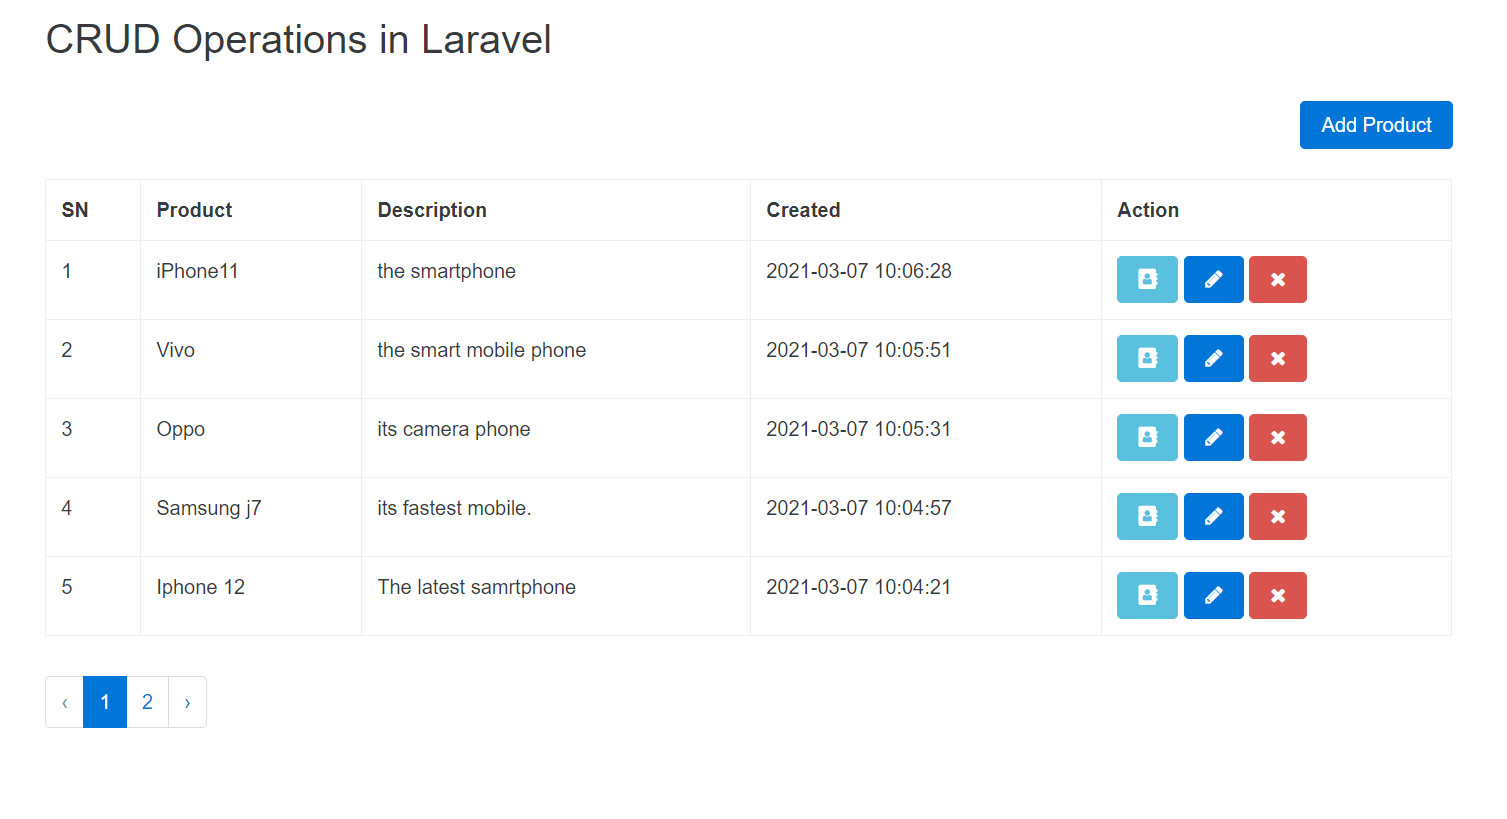
CRUD (create, read, update, delete) are common functions in any web application. If you’re developing application using Laravel and looking CRUD functionality then you’re here at the right place. In this tutorial, we will cover tutorial to implement basic CRUD functions with product data to display product list, add new product, edit and delete products.

Also, read:
So Let’s proceed with tutorial step by step to implement basic CRUD functions.
Step1: Create Laravel Application
First we will create laravel application laravel_crud using below command. You need to run below command on command prompt to create application.
composer create-project --prefer-dist laravel/laravel laravel_crud --prefer-dist
Step2: Setting MySQL Database
We will create MySQL database laravel_crud and then setting up database connection in .env file.
DB_CONNECTION=mysql
DB_HOST=127.0.0.1
DB_PORT=3306
DB_DATABASE=laravel_crud
DB_USERNAME=root
DB_PASSWORD=
Then we will create table products using below table create statement.
CREATE TABLE `products` (
  `id` int(10) UNSIGNED NOT NULL,
  `name` varchar(255) COLLATE utf8mb4_unicode_ci NOT NULL,
  `detail` text COLLATE utf8mb4_unicode_ci NOT NULL,
  `created_at` timestamp NULL DEFAULT NULL,
  `updated_at` timestamp NULL DEFAULT NULL
) ENGINE=InnoDB DEFAULT CHARSET=utf8mb4 COLLATE=utf8mb4_unicode_ci;
ALTER TABLE `products`
  ADD PRIMARY KEY (`id`);
ALTER TABLE `products`
  MODIFY `id` int(10) UNSIGNED NOT NULL AUTO_INCREMENT, AUTO_INCREMENT=1;
Step3: Create Resource Route
We need to add resource route to perform crud functions. We will add following into routes/web.php file to set product route for our controller.
<?php

use Illuminate\Support\Facades\Route;

Route::get('/', function () {
    return view('welcome');
});

Route::resource('product','ProductController');
Step4: Create Controller and Model
We will create product controller and product model. So we will run below command to create controller and model.
php artisan make:controller ProductController --resource --model=Product
After running above command, app/Http/Controllers/ProductController.php file will be created with create(), show(), edit(), update() functions.
We will open the app/Http/Controllers/ProductController.php file and copy and paste following code into this file to implement CRUD functions.
<?php

namespace App\Http\Controllers;

use App\Product;
use Illuminate\Http\Request;

class ProductController extends Controller{

    public function index()    {
        $products = Product::latest()->paginate(5);
        return view('product.index',compact('products'))
            ->with('i', (request()->input('page', 1) - 1) * 5);
    }

    public function create() {
        return view('product.create');
    }

    public function store(Request $request) {
        $request->validate([
            'name' => 'required',
            'detail' => 'required',
        ]);

        Product::create($request->all());

        return redirect()->route('product.index')
                        ->with('success','Product created successfully.');
    }

    public function show(Product $product){
        return view('product.show',compact('product'));
    }

    public function edit(Product $product){
        return view('product.edit',compact('product'));
    }

    public function update(Request $request, Product $product){
        $request->validate([
            'name' => 'required',
            'detail' => 'required',
        ]);

        $product->update($request->all());

        return redirect()->route('product.index')
                        ->with('success','Product updated successfully');
    }

    public function destroy(Product $product) {
        $product->delete();

        return redirect()->route('product.index')
                        ->with('success','Product deleted successfully');
    }
}
There are also Product model created in app/Product.php. We will open model file and copy and use below code to implement product model.
<?php

namespace App;

use Illuminate\Database\Eloquent\Model;

class Product extends Model {
    protected $fillable = [
        'name', 'detail'
    ];
}
Step5: Creating Template Files
Now we will create template files using Bootstrap to create product add forms, display product list, edit and delete product. So we will create product folder into view and create following files with design HTML.
resources/views/product/layout.blade.php
<!DOCTYPE html>
<html>
<head>
<meta name="viewport" content="width=device-width, initial-scale=1">
<meta http-equiv="Content-Type" content="text/html; charset=utf-8" />
<title>phpzag.com : Demo CRUD Operation in Laravel</title>
<link href="https://cdnjs.cloudflare.com/ajax/libs/twitter-bootstrap/4.0.0-alpha/css/bootstrap.css"
rel="stylesheet">
<link href="https://maxcdn.bootstrapcdn.com/font-awesome/4.7.0/css/font-awesome.min.css"
rel="stylesheet"/>
</head>
<link rel="icon" href="https://www.phpzag.com/wp-content/uploads/2019/05/cropped-cropped-coollogo_com-7816453-60x60-32x32.png"
sizes="32x32" />
</head>
<body>
<nav class="navbar navbar-expand-md navbar-light" style="background-color: #73b2fc">
    <a href="http://www.phpzag.com" class="navbar-brand">PHPZAG.COM</a>
    <button type="button" class="navbar-toggler" data-toggle="collapse" data-target="#navbarCollapse">
        <span class="navbar-toggler-icon"></span>
    </button>

    <div class="collapse navbar-collapse" id="navbarCollapse">
        <div class="navbar-nav">
            <a href="http://www.phpzag.com" class="nav-item nav-link active">Home</a>
        </div>
    </div>
</nav>
<div class="container">
	<br>
	<h2>CRUD Operations in Laravel</h2>
    @yield('content')
</div>
</body>
</html>
resources/views/product/index.blade.php
@extends('product.layout')
@section('content')
	<br>
    <div class="row">
        <div class="col-lg-12 margin-tb">
            <div class="pull-left">
            </div>
            <div class="pull-right">
                <a class="btn btn-primary" href="{{ route('product.create') }}"> Add Product</a>
            </div>
        </div>
    </div>
	<br>
    @if ($message = Session::get('success'))
        <div class="alert alert-success">
            <p>{{ $message }}</p>
        </div>
    @endif
    <table class="table table-bordered">
        <tr>
            <th>SN</th>
            <th>Product</th>
            <th>Description</th>
			<th>Created</th>
            <th width="280px">Action</th>
        </tr>
        @foreach ($products as $product)
        <tr>
            <td>{{ ++$i }}</td>
            <td>{{ $product->name }}</td>
            <td>{{ $product->detail }}</td>
			<td>{{ $product->created_at }}</td>
            <td>
                <form action="{{ route('product.destroy',$product->id) }}" method="POST">
                    <a class="btn btn-info" href="{{ route('product.show',$product->id) }}"><span class="fa fa-address-book"></a>
                    <a class="btn btn-primary" href="{{ route('product.edit',$product->id) }}"><i class="fa fa-pencil"></i></a>
                    @csrf
                    @method('DELETE')
                    <button type="submit" class="btn btn-danger"><span class="fa fa-remove"></span></button>
                </form>
            </td>
        </tr>
        @endforeach
    </table>
    {!! $products->links() !!}
@endsection
resources/views/product/create.blade.php
@extends('product.layout')
@section('content')
<br>
<div class="row">
    <div class="col-lg-12 margin-tb">
        <div class="pull-left">
            <h4>Add Product</h4>
        </div>
        <div class="pull-right">
            <a class="btn btn-primary" href="{{ route('product.index') }}"> Back</a>
        </div>
    </div>
</div>
@if ($errors->any())
    <div class="alert alert-danger">
        <strong>Whoops!</strong> There were some problems with your input.<br><br>
        <ul>
            @foreach ($errors->all() as $error)
                <li>{{ $error }}</li>
            @endforeach
        </ul>
    </div>
@endif
<form action="{{ route('product.store') }}" method="POST">
    @csrf
     <div class="row">
        <div class="col-xs-12 col-sm-12 col-md-12">
            <div class="form-group">
                <strong>Name:</strong>
                <input type="text" name="name" class="form-control" placeholder="Name">
            </div>
        </div>
        <div class="col-xs-12 col-sm-12 col-md-12">
            <div class="form-group">
                <strong>Detail:</strong>
                <textarea class="form-control" style="height:150px" name="detail" placeholder="Detail"></textarea>
            </div>
        </div>
        <div class="col-xs-12 col-sm-12 col-md-12 text-left">
                <button type="submit" class="btn btn-primary">Save</button>
        </div>
    </div>
</form>
@endsection
resources/views/product/edit.blade.php
@extends('product.layout')

@section('content')
	<br>
    <div class="row">
        <div class="col-lg-12 margin-tb">
            <div class="pull-left">
                <h4>Edit Product</h4>
            </div>
            <div class="pull-right">
                <a class="btn btn-primary" href="{{ route('product.index') }}"> Back</a>
            </div>
        </div>
    </div>

    @if ($errors->any())
        <div class="alert alert-danger">
            <strong>Whoops!</strong> There were some problems with your input.<br><br>
            <ul>
                @foreach ($errors->all() as $error)
                    <li>{{ $error }}</li>
                @endforeach
            </ul>
        </div>
    @endif

    <form action="{{ route('product.update',$product->id) }}" method="POST">
        @csrf
        @method('PUT')

         <div class="row">
            <div class="col-xs-12 col-sm-12 col-md-12">
                <div class="form-group">
                    <strong>Name:</strong>
                    <input type="text" name="name" value="{{ $product->name }}" class="form-control" placeholder="Name">
                </div>
            </div>
            <div class="col-xs-12 col-sm-12 col-md-12">
                <div class="form-group">
                    <strong>Detail:</strong>
                    <textarea class="form-control" style="height:150px" name="detail" placeholder="Detail">{{ $product->detail }}</textarea>
                </div>
            </div>
            <div class="col-xs-12 col-sm-12 col-md-12 text-left">
              <button type="submit" class="btn btn-primary">Save</button>
            </div>
        </div>

    </form>
@endsection
resources/views/product/show.blade.php
@extends('product.layout')
@section('content')
	<br>
    <div class="row">
        <div class="col-lg-12 margin-tb">
            <div class="pull-left">
                <h4> Product Details</h4>
            </div>
            <div class="pull-right">
                <a class="btn btn-primary" href="{{ route('product.index') }}"> Back</a>
            </div>
        </div>
    </div>

    <div class="row">
        <div class="col-xs-12 col-sm-12 col-md-12">
            <div class="form-group">
                <strong>Name:</strong>
                {{ $product->name }}
            </div>
        </div>
        <div class="col-xs-12 col-sm-12 col-md-12">
            <div class="form-group">
                <strong>Details:</strong>
                {{ $product->detail }}
            </div>
        </div>
    </div>
@endsection
Step6: Run Application
Now finally, we will run the application using below command.
php artisan serve
Now open below URL in browser to access the application.
http://localhost:8000/product
You may also like:
- Build Live Chat System with Ajax, PHP & MySQL
- Create Event Calendar with jQuery, PHP and MySQL
- Build Invoice System with PHP & MySQL
- Push Notification System with PHP & MySQL
- Create Bootstrap Cards with PHP and MySQL
- Build Content Management System with PHP & MySQL
- Convert Unix Timestamp To Readable Date Time in PHP
- Ajax Drop Down Selection Data Load with PHP & MySQL
- Inventory Management System with Ajax, PHP & MySQL
- Drag and Drop File Upload using jQuery and PHP
- Load Dynamic Content in Bootstrap Popover with Ajax, PHP & MySQL

very nice crud operation in laravel
thanks!